Shipping
Which shipping couriers do you use?
We use FedEx for all our shipping needs. For more information, you can refer to our full Shipping Policy.
Do you ship worldwide?
Yes, we ship internationally! However, there are a few destinations where we are unable to deliver.
We are currently unable to ship to Australia, China, Hong Kong, Iran, New Zealand, Taiwan.
If you're located in one of these countries, please contact our local distributor for assistance. You can find more information on our Distributor Network. In some cases, a local agent may be available in your region.
I would like to update my delivery address. Can I do that?
Address changes can only be made before the shipment is dispatched. Once an order has shipped, we are unable to update the address. If you need to change your delivery address, please get in touch with us before your order is shipped.
Payment
What payment methods do you accept?
We accept the following payment methods for your convenience:
- Credit Cards (Visa, MasterCard, American Express)
- PayPal
- Google Pay
- Apple Pay
- Shop Pay
How much do you charge for shipping?
Shipping charges depend on the destination. The exact shipping cost will be automatically calculated and displayed at checkout, so you'll know the total before you complete your purchase.
Unless otherwise stated, customs duties, import taxes, and any other fees charged by your country or region are not included in the product price or shipping cost. These fees are the responsibility of the purchaser. For details, please check with your local customs
Other
Do you have a distributor in my country?
We have distributors in some countries and regions. Please visit Kakuri Sangyo's Overseas Distributor Network for more details.
Do you have a return and exchange policy?
Yes, we do. Please refer to the following:
- We do not accept returns or exchanges for reasons such as ordering the wrong item or the product not matching your expectations.
- If there is an issue with the outer packaging (e.g., damaged box), the product itself is not eligible for a return or exchange.
- If you receive a defective product, please get in touch with us within 7 days of receipt. Once we confirm that the product is faulty, you will need to return it within 10 days of our confirmation.
- Returns are only accepted if you notify us in advance. We cannot accept returns that are unsolicited or unapproved.
- Return shipping costs will only be covered by us if the product is defective or if the return is a result of an error on our part.
I would like to become a distributor of Kakuri products. How can I do that?
Thank you for your interest! Please contact us through our website's Partnerships & Networks page for more information.
Do you have a catalog or price list?
You can download our catalog by registering as a newsletter subscriber.
If you're unable to register, please reach out to us via the Contact page for assistance.
Japanese Planes
What is the bevel angle of a Japanese plane blade?
Japanese plane blades typically have a bevel angle between 31° and 45°.
Softer woods benefit from a shallower bevel, while harder woods require a steeper angle.
For Kakuri planes, the standard angle is about 38°, which is considered ideal for working with a wide range of wood types.
This angle is referred to in Japan as the hachi-bu angle.
What Japanese hand plane do you recommend for beginners?
If you're looking to learn how to use a plane or want to try it out, we recommend the Laminated Steel 42mm plane.
It's affordable, and the steel backing makes it easier to sharpen.
This plane is great for practicing basic plane adjustments and techniques.
If you're working with a specific wood width, we suggest selecting a plane with a slightly wider blade than the wood you plan to work with.
What should I do before using my new Japanese hand plane for the first time?
Once your plane arrives, follow these steps to prepare it for use:
- Sharpen the blade.
- Adjust the body of the plane (note that adjustments may be necessary each time you use the tool).
For detailed guidance, refer to our Setup Guide.
Can I use a Japanese hand plane on hardwoods?
Yes, with the right adjustments, a Japanese hand plane can handle hardwoods.
Adjust the plane's bevel angle and the blade's sharpening angle according to the hardness of the wood.
For example, with a plane set to a 38° bevel and a sharpening angle of 27°, the plane can handle softer woods.
For harder woods, use a steeper bevel and a more obtuse sharpening angle (around 30°).
How do I repair a Japanese hand plane?
For guidance on repairs, refer to the following articles:
- How to Adjust the Chip Breaker of Your Japanese Hand Plane
- How to Adjust the Blade of Your Japanese Hand Plane
- How to Tune the Sole of Your Japanese Hand Plane
- How to Sharpen the Blade of Your Japanese Hand Plane
How should I store my Japanese hand plane?
To store your hand plane properly:
- Use a brush to remove any wood chips from the blade and body.
- Wipe the blade with a cloth soaked in anti-rust oil.
- Store the blade in the plane's body, ensuring the blade is retracted.
- Store the plane in a cool, dry place, away from areas with high humidity. Wood can warp or deteriorate when exposed to extreme conditions.
Japanese Chisels
What are Japanese chisels used for?
Japanese chisels are traditional woodworking tools primarily used for carving, shaping, and fine detail work. Here are the different types of chisels we offer at Kakuri and their common uses:
- Oire Nomi Chisel (Standard Chisel): The most common type of chisel, used for cutting holes and smoothing or leveling wood surfaces.
- Atsu Nomi Chisel (Thick Chisel): Larger and sturdier, this chisel is designed for working with thick or hard woods. It's ideal for deep cuts and requires strong, steady strikes.
- Mokucho Nomi Chisel (Woodcarving Chisel): Designed for intricate work like carving textures or shapes into the wood surface, this chisel has a variety of blade shapes, including round (marked with "R"), flat, and curved blades. The blades are typically thinner for more detailed carving.
What should I consider when purchasing a chisel set for woodworking?
Choose a chisel size based on the width of the cuts you plan to make.
Unlike some other tools, where one size may fit multiple tasks, chisels need to be carefully selected for specific tasks, such as mortising.
Be sure to pick the right width for the job to ensure precision and efficiency.
What should I do when I receive my chisel before using it?
Follow these steps to prepare your chisel for use properly:
- Adjust the katsura (chisel hoop)
- Sharpen the blade
Do I need to adjust the katsura (chisel hoop) on a new Japanese chisel?
How often should I do this?
How often should I do this?
New chisels require an initial adjustment of the katsura (the hoop around the handle) to ensure a secure fit.
Once this is done, no further adjustments are necessary unless the hoop becomes loose with use.
For detailed instructions on how to adjust the katsura, check out our article,
The Role of the Katsura (Chisel Hoop) & How to Adjust It.
Why is the back of a Japanese chisel hollowed out?
The hollowed-out area in the center of the back of the chisel is called the urasuki.
This design reduces the contact area with the sharpening stone, allowing for more precise and efficient honing.
In traditional Japanese woodworking, a perfectly flat back and a straight edge are crucial for the quality of the cut.
The urasuki minimizes friction, allowing the chisel to glide smoothly during use.
For more details, please refer to our article on The Differences Between Japanese and Western Chisels.
What is the best way to sharpen a Japanese chisel?
We recommend using at least three types of sharpening stones: a coarse, medium, and fine stone.
The sharpening process is similar to that of a Japanese hand plane, so you can refer to our guide on How to Sharpen the Blade of Your Japanese Hand Plane.
If you find it difficult to maintain the correct angle while sharpening, we suggest using our blade sharpening guide to help maintain a consistent angle for a sharper edge.
How do I repair a chisel that has a chipped edge?
If your chisel's edge is chipped, start by using a coarse sharpening stone to grind down the chipped area until the edge is smooth.
Then, move to finer stones to refine the edge, making it sharp and precise for cutting.
The sharpening method is similar to that of a hand plane, so you can refer to our guide on How to Sharpen the Blade of Your Japanese Hand Plane for step-by-step instructions.
What is the optimal bevel angle for a Japanese chisel?
The standard bevel angle for Japanese chisels is generally around 30°, which is suitable for a variety of tasks, including carving holes and making detailed cuts.
Do Japanese chisels require a secondary bevel?
A secondary bevel is not recommended for Japanese chisels.
While it can be a simpler method for maintaining the edge, it complicates the sharpening process over time and makes it more difficult to adjust the blade's angle.
We advise maintaining a single bevel angle for long-term use.
Japanese Saws
What are Japanese saws used for?
Japanese saws are traditional hand tools primarily used for cutting wood.
They are commonly employed in construction, furniture making, woodworking, and even gardening.
We recommend choosing the right saw based on your specific task and the material you're working with.
For more guidance, check out our article on How to Choose a Japanese Saw.
Are Japanese saws worth the investment?
Yes, depending on the task, Japanese saws can offer more value than Western-style saws, especially when precision, delicate work, and sharpness are needed.
Japanese saws excel in tasks requiring clean cuts and fine finishes.
For more details, please take a look at our guide on How to Use a Japanese Saw.
How long do Japanese saws last before needing replacement?
The lifespan of a Japanese saw varies depending on usage, frequency, material, and maintenance.
For regular use, a saw may last from 6 months to a year.
To extend the life of your saw, consider the following tips:
- Regularly clean the blade with resin remover.
- Choose the right saw for the material (rip cut, crosscut, or ryoba).
- Avoid applying excessive force while cutting.
- Store your saw in a protective case.
- Keep it dry to prevent rust.
Are Japanese saws suitable for cutting hard wood?
While it takes longer to cut, Japanese saws can handle hard wood, provided you don't apply excessive force, as this can risk damaging the blade.
Additionally, be cautious when cutting green wood.
For more details on selecting the right saw, check our article on How to Choose a Japanese Saw.
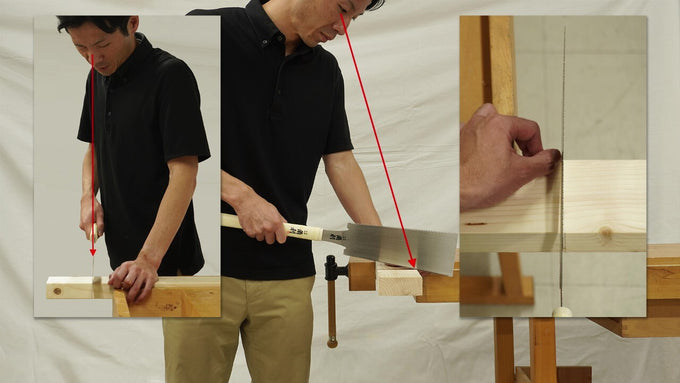
Do you have any tips for cutting 90/45-degree crosscuts and 45-degree miters with a Japanese saw?
To make accurate cuts, start by marking your cutting line carefully.
Secure the material with clamps to prevent it from moving.
When using the saw, align the blade with the marked line and start cutting slowly, ensuring the saw blade follows the line for precise results.
For more tips, check out our guide on How to Use a Japanese Saw.
Japanese Hammers
What types of Japanese hammers are available?
Japanese hammers come in various shapes and sizes, each designed for specific tasks.
Some of the hammers we offer at Kakuri include:
- Daruma Genno: A short, heavy hammer with a stable center of gravity, ideal for striking chisels.
- Sakkiri Kanazuchi (Pointed Hammer): One end of the hammer is pointed, making it useful for driving nails.
- Hakoya Kanazuchi (Boxer Hammer): A hammer with a claw for pulling nails.
- Brass and Pure Copper Genno: Made from softer materials, these hammers are used when you want to avoid damaging the surface you're working on, such as for adjusting plane blades.
- Wooden Mallet: A wooden hammer used for striking wood without causing damage to the material.
How do I fix a loose hammerhead?
To secure a loose hammerhead, follow these steps:
- Strike the handle: Hold the hammer with the head facing up and strike the handle's end on the ground. This will help tighten the head.
- Repeat if needed: If the head is still loose, repeat the process until it's firmly in place.
- Final Adjustment: Once tightened, trim off any excess wood from the handle.
- Wedge it: If necessary, drive a wedge into the handle to ensure a secure fit.
For a more detailed step-by-step guide, check out our article on Adjusting a Loose Handle and Replacing Handles for Wooden Genno.